


Managing backup item properties
Document Backup allows customizing backup items at any time by
providing quick access to item properties. This will let you
customize such features as:
To open item properties:
The following item properties are available.
To open item properties:
- Select the item to be customized and then click the Item Properties button on the toolbar at the top or on the taskbar on the left. You can also open the Item Properties window by selecting the Item Properties item on the File menu or on the right-click menu or simply by hitting Alt+Enter on your keyboard.
The following item properties are available.
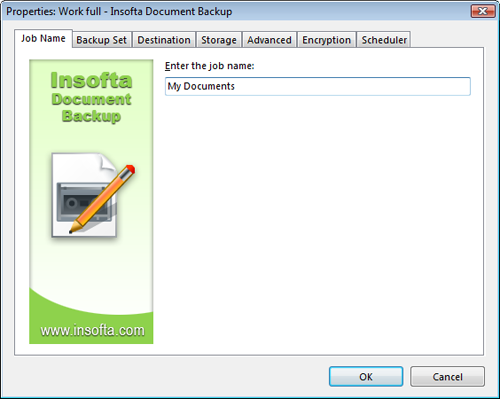
Item Name tab
Enter item name - sets the name of the item that will appear on the
items list in the program's main window. To change the name, click
on the Enter item name edit box, enter the new name and then click
OK to complete. Click Cancel to decline changes and return to the
program's main window.
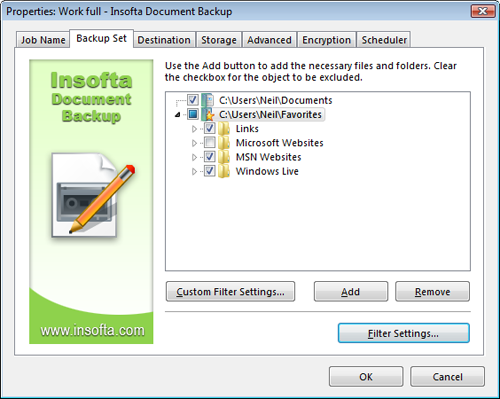
Backup Set tab
This group of settings defines the objects to be backed up.
The list of objects in the Folders and files group displays the objects to be backed up. Objects that are not ticked off are going to be excluded from the backup item. You can select the objects to be added to backup or to be excluded from backup at any time.
To add more folders or files to selected backup item: click on the Add... button and then select the type of the object to be added to backup item. In the Open window that appears, select the object to be added to this backup item and then click OK to complete.
To add special objects (My Documents, Favorites, Desktop, Start Menu or Address book) to selected backup item: click on the Add... button and then select the special object to be added on the list that appears.
You can also right-click anywhere on the Folders and files white space and then select the objects to be added to backup item.
To remove an object from the Folders and files list: click on the object name and then click on the Remove button. Please note: the program will not prompt you to confirm the removal, so make sure you really want to remove the item from the backup before hitting the Remove button.
Document Backup allows specifying individual settings for various file types. That means, you can tell the program which file types are to be included, excluded, skipped, etc. To adjust file-specific settings:
 To enter several file types in the
same option, separate them with semicolon. Please refer to Windows manual
for more information on using file masks.
To enter several file types in the
same option, separate them with semicolon. Please refer to Windows manual
for more information on using file masks.
The list of objects in the Folders and files group displays the objects to be backed up. Objects that are not ticked off are going to be excluded from the backup item. You can select the objects to be added to backup or to be excluded from backup at any time.
To add more folders or files to selected backup item: click on the Add... button and then select the type of the object to be added to backup item. In the Open window that appears, select the object to be added to this backup item and then click OK to complete.
To add special objects (My Documents, Favorites, Desktop, Start Menu or Address book) to selected backup item: click on the Add... button and then select the special object to be added on the list that appears.
You can also right-click anywhere on the Folders and files white space and then select the objects to be added to backup item.
To remove an object from the Folders and files list: click on the object name and then click on the Remove button. Please note: the program will not prompt you to confirm the removal, so make sure you really want to remove the item from the backup before hitting the Remove button.
Document Backup allows specifying individual settings for various file types. That means, you can tell the program which file types are to be included, excluded, skipped, etc. To adjust file-specific settings:
- Click on the File-specific Settings... button. This will open the File-specific Settings window where you can make further adjustments.
- To include only files of specific types, click on the Include only edit box and then enter file masks for the file types to be included in the backup.
- To exclude files of specific types from backup, click on the Exclude files edit box and then enter file masks for the file types to be included from the backup.
- To specify files types that are not to be compressed, click on the Do not compress edit box and then enter file masks for the file types to be not compressed. This option is handy for compressed images, audio and video files, program archives, etc.
- Set attributes files must have in order to be processed: Read-only, System or Hidden. To toggle a setting, simply click on the checkbox by the corresponding setting.
- Click OK to complete. Clicking Cancel will decline changes and bring you back to the Properties window.
To enter several file types in the
same option, separate them with semicolon. Please refer to Windows manual
for more information on using file masks.
Destination tab
This tab defines the destination of the selected backup set. You can choose
whether you want to store your backup data on:
Depending on the chosen destination, you will be asked to provide the selected destination folder's location and access credentials. Let's take a closer look at each option.
Local/LAN
When this option is selected, the data will be backed up to the selected folder on a local or network hard disk.
To set a local/LAN destination folder, clickon the Browse... button and then select the destination folder in the window that appears.
You can also create a new folder for storing your backup data; just click on the New Folder... button in the Select Folder window.
FTP
With this option, the application can back up your data to the specified folder on a remote FTP server. This adds makes your workplace really flexible and lets you ensure the safety of your data even when you are far away from your office network.
Read more on Backup your data to FTP.
CD/DVD/Blu-Ray/HD-DVD
Backs up your data to a local CD, DVD, Blu-Ray or HD-DVD disc. With this option you can keep your data safe even when the computer is lost or is no longer functioning.
Read more on Backup your data to CD, DVD, Blu-Ray or HD-DVD.
- Local or network hard disk
- FTP folder
- Local CD, DVD, Blu-Ray, HD-DVD disc
Depending on the chosen destination, you will be asked to provide the selected destination folder's location and access credentials. Let's take a closer look at each option.
Local/LAN
When this option is selected, the data will be backed up to the selected folder on a local or network hard disk.
To set a local/LAN destination folder, clickon the Browse... button and then select the destination folder in the window that appears.
You can also create a new folder for storing your backup data; just click on the New Folder... button in the Select Folder window.
FTP
With this option, the application can back up your data to the specified folder on a remote FTP server. This adds makes your workplace really flexible and lets you ensure the safety of your data even when you are far away from your office network.
Read more on Backup your data to FTP.
CD/DVD/Blu-Ray/HD-DVD
Backs up your data to a local CD, DVD, Blu-Ray or HD-DVD disc. With this option you can keep your data safe even when the computer is lost or is no longer functioning.
Read more on Backup your data to CD, DVD, Blu-Ray or HD-DVD.
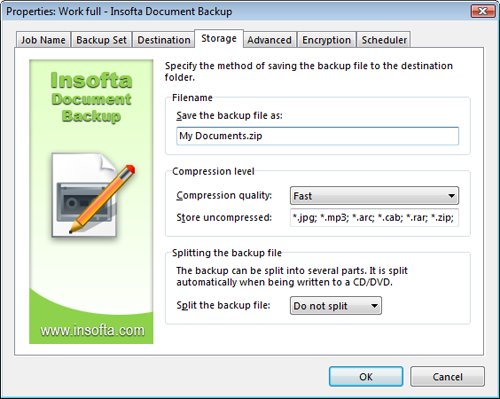
Storage tab
These options specify how the backup files are to be saved to the
destination folder.
Depending on the Destination settings, some of these options may vary. Backup files stored on a local or network hard disk or FTP may be split by a certain size.
To specify storage options:
Splitting options available:
To set a custom volume size:
To get to the Storage tab,
right-click on the backup item on the application's workspace, then select
Properties on the menu that appears, and then click on the Storage tab.
Depending on the Destination settings, some of these options may vary. Backup files stored on a local or network hard disk or FTP may be split by a certain size.
To specify storage options:
- Click on the File name box and then enter how you want to name the file that will contain your backup data (e.g., MyDocuments.zip).
- In the Compression level group, pull down the Compression quality menu and then select the desired level of compression (None � no compression, Super-Fast � highest speed, least space saved, Fast, Normal, Extra � most space saved, slowest speed).
- Now click on the Do not compress box and list the files to be left uncompressed (compressed files, images, music, etc.)
- In the Splitting backup file group, select the desired volume size for the backup file.
- Click OK to apply changes.
Splitting options available:
- Do not split � will not split backup file.
- CD/DVD � split to the standard CD or DVD size.
- Custom � split to user-defined size.
To set a custom volume size:
- Click on the size box on the right and adjust the custom size.
To get to the Storage tab,
right-click on the backup item on the application's workspace, then select
Properties on the menu that appears, and then click on the Storage tab.
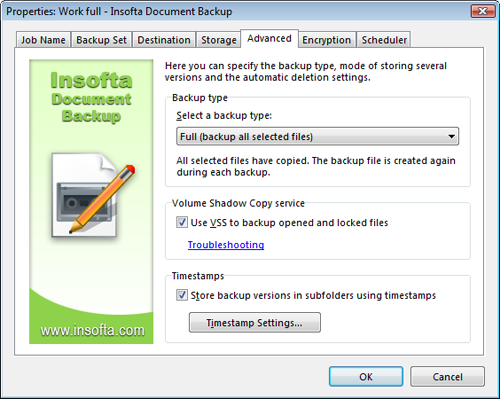
Advanced tab
These options will let you specify how much of your data will be backed up
during each backup session, and what name will be given to the backup files.
Backup Type
The software can automatically backup all of your data (Full backup) or just the changed portion of it (Incremental backup). You may also choose whether the application is to add new data to an existing backup file or create a new backup file during each backup session.
To set backup type:
Backup type options:
To get to the Advanced tab,
right-click on the backup item on the application's workspace, then select
Properties on the menu that appears, and then click on the Advanced tab.
Timestamps
You can use timestamps to store multiple versions of a backup file in the same destination folder.
To enable timestamps:
You can set more timestamps options by clicking on the Timestamp settings... button.
Read more on Timestamps.
Backup Type
The software can automatically backup all of your data (Full backup) or just the changed portion of it (Incremental backup). You may also choose whether the application is to add new data to an existing backup file or create a new backup file during each backup session.
To set backup type:
- In the Backup type group, pull down the Backup type menu and then select the desired backup type on the list that appears.
- Click OK to apply changes.
Backup type options:
- Full (backup all selected files) � will create a new backup file and add all selected files to it during each backup session.
- Full (update existing archive) � will refresh the existing backup file by adding new, removing deleted, and replacing modified files from the selected data folder in it.
- Incremental (new and modified files) � will create a new backup file and add new and modified files from the selected data folder to it.
To get to the Advanced tab,
right-click on the backup item on the application's workspace, then select
Properties on the menu that appears, and then click on the Advanced tab.
Timestamps
You can use timestamps to store multiple versions of a backup file in the same destination folder.
To enable timestamps:
- Select the Use timestamps option on the Advanced tab.
You can set more timestamps options by clicking on the Timestamp settings... button.
Read more on Timestamps.
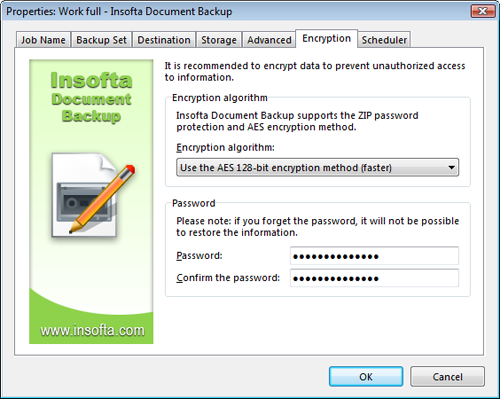
Encryption tab
Encrypting your backup copy will keep it safe and unavailable to an unwanted eye.
Encryption algorithm - sets the encryption method the program should use for encrypting your backup set. Click on the Encryption algorithm drop-down list and then select the encryption algorithm to be used. You can find more information on various encryption algorithms online.
Password - sets the encryption password. Click on the Password edit box and then enter the encryption password.
Confirm password - verifies the encryption password. Click on the Conform password edit box and re-type the password.
Please read Encrypting your backup copy for more information on using encryption in your backups.
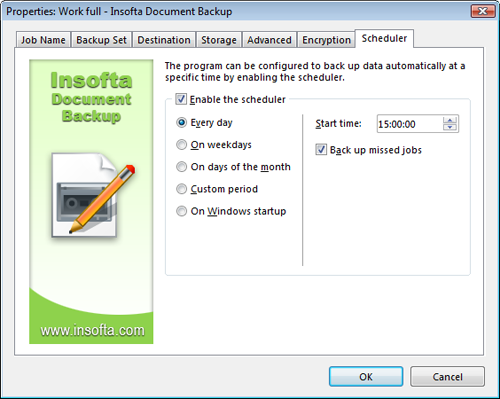
Scheduler tab
The built-in scheduler will do the backup completely automatically and
define how often the program must backup the selected item.
Enable the scheduler - enables or disables the built-in scheduler.
Every day - the backup will be performed every day at the time you have specified in the Start time field.
On week days - the backup will be performed on the first day of each week at the time you have specified in the Start time field.
On month days - the backup will be performed on the first day of each month at the time you have specified in the Start time field.
Custom period - the backup will be performed on the specific day of month, at the specific hour and minute, which you can set in the Custom period settings that appear upon selection of this option.
On Windows startup - the backup will be performed every time Windows starts on your computer.
Backup item if the scheduled time is missed - the program will backup this item when it is run if the scheduled time for the backup is missed.
You must have at least
one item available in order to setup the scheduler.


 Introduction
 Working with Document Backup
 Managing backup items